Mrs. Jackson Cooks

Life through food

Cheap and easy: pasta puttanesca

IMG_5626.JPG

I’ve already blogged about puttanesca with prawns, as a good diet friendly dish, and it certainly is.  This is a slightly different version.  Cheap, just as easy, because it uses tinned sardines.

The prawn version is here https://mrsjacksoncooks.wordpress.com/2011/03/01/sweet-pepper-and-bacon-pasta-2/

I have used tinned sardines before, but I don’t like the bones in them.  Every recipe I’ve found previously always says, leave them in, they’re small and good for you, you don’t notice them.  I do.  I don’t like them!  This was the first recipe that said take them out, and said how to (although I probably could have figured it out, having something that tells you how, takes the guesswork out of it).  Most puttanesca recipes use anchovies but I’m not a fan of them, so this recipe works much better for me.

It’s a post by Jack Monroe on the Guardian.  I like Jack Monroe.  Her recipes are alwayseasy, and often use stuff that’s in the cupboard.  I met her through working for Oxfam, and like her honesty and grittiness, and of course, the easiness of her recipes.  Her recipe is here http://www.theguardian.com/lifeandstyle/2014/apr/16/jack-monroe-spaghetti-alla-puttanesca-recipe 

As always, I’ve adapted it.  I used macaroni because that’s what I had in.  You can use whatever pasta you like.  Spaghetti is good too.  I do normally use capers, however, I had run out this last time, so added in juice of one lemon, which worked well too.

Pasta puttanesca

Serves 2

  • 1 onion, finely chopped
  • 4 garlic cloves, peeled & crushed
  • 1 chilli, chopped
  • 1 tsp olive oil
  • 1 tin tomatoes
  • 1 tin sardines
  • 150g dried pasta of your choice
  • 1 tbsp capers, chopped, or juice 1 lemon
  • 20 large olives (I used green), pitted and sliced
  • Handful of chopped fresh basil
  • salt and pepper to taste
  • handful of parmesan (optional)
  1. Boil the pasta until al dente.  Remove and drain, and set aside (if the pasta is done much before the sauce, you may want to add some oil to it to stop it sticking)
  2. Meanwhile, put the oil in a pan on a medium heat.
  3. When warmed, add the onion, garlic and chilli and cook until the onion is softened.
  4. Remove the bones from the sardines by slicing down the back and opening and removing easily as they’re all in one piece.  Chop up the sardines.
  5. Add the tomatoes to the pan, breaking them up with the spatula or spoon.  Bring to the boil and then simmer for 5 minutes.
  6. Add the sardines, capers or lemon juice and continue simmering until you have a good saucey consistency.
  7. Then add the olives and basil in.  Taste and add seasoning as needed.
  8. Stir through the pasta until combined.
  9. Turn into bowls and scatter parmesan over the top if using.
  10. Enjoy the healthy, easy goodness
Leave a comment »

Hug in a bowl: creamy chicken soup

20120710-073432 PM.jpg

20120708-053115 PM.jpg

The title belies this soup – there isn’t actually any cream in this soup, and it’s relatively low in calories too for a chicken soup – 339. Of course there are soups with fewer calories, but when you want a nice hearty chicken soup, you’re not really thinking of calories. This one hits the spot and it pretty simple to make.

I had made the Italian lemon chicken recipe again with a whole chicken and so used the meat left on the bones when I chopped it up to make this soup. But left over roast chicken or even chicken breasts, pre cooked (grilled for example) would work just as well.

It’s pretty simple to make, doesn’t take long and if you don’t have a blender, leave it chunky. But a chunky soup will be clear rather than creamy.

The original recipe is on my go-to website here: http://www.bbcgoodfood.com/recipes/9831/roast-chicken-soup

I didn’t bother with the yoghurt and I don’t think it needs it but you can add it if you like.

Creamy chicken soup

Serves 4

  • 1 tbsp oil
  • 2 onions, finely chopped
  • 3 carrots, finely chopped
  • small handful of thyme leaves, chopped
  • 1.2 litres chicken stock (I made this from the chicken bones but you can use stock cubes)
  • 300g pre cooked boneless chicken, chopped into small pieces.
  • 100g peas
  • 1 tbsp lemon juice
  • 1 garlic clove, crushed
  • salt & pepper
  • heat the oil in a large saucepan, on a low heat, and fry the onions, carrots and thyme until softened but not browned – for about 10 minutes
  • Turn up the heat, add the chicken stock and chicken. Bring to the boil and simmer for about 10 minutes.
  • Blend half the soup until smooth, then mix it all together and add the peas, garlic and lemon juice. Season to taste. Give it a good stir and heat through and then serve with some crusty bread.
  • Enjoy the comforting warming soup 🙂
Leave a comment »

Chicken Channa Dhal

20120611-124455 PM.jpg

I know, it’s been a while. My new job is being quite demanding, as it my social life! I can’t promise more posts in the near future, but I do promise, whatever I do post will be quality.

Mr J and Kaz were both in need of comfort food. It was post a big weekend (what weekend isn’t one of those at the moment?!) and they were feeling delicate. And so I made Chicken Dhal. As far as I’m concerned there’s nothing more comforting than dhal. We had it with naan. It’s also very healthy and low in fat and calories and all those things so great for the bikini diets – maybe have it with chappattis instead of naans. You can, of course, eat it with rice too.

According to my calories in recipes site, theres 352 calories, so with a naan of about 150 calories, you’ve got a perfect dinner meal at 500 calories. Or just leave out the naan if you’re really going for it!

Channa Dhal is really dried yellow split peas rather than strictly lentils but they still come in the same category.

I found the recipe here and more or less followed it, just adding in mushrooms for more vege, and leaving out the leeks, replacing them with onions. I also added garlic and ginger because they’re great for stomachs and no Indian recipe is without them as far as I’m concerned.

http://www.celtnet.org.uk/recipes/miscellaneous/fetch-recipe.php?rid=misc-chicken-chana-dhal

And here’s my version:

Chicken Channa Dhal

Serves 3

  • 100g channa dhal, rinsed
  • 1 tsp coriander seeds
  • 1 tbsp sunflower, vegetable, walnut, peanut oil etc
  • 1 onion, finely chopped
  • 2 garlic cloves, minced
  • a small piece of fresh ginger, peeled & grated
  • pinch of curry leaves
  • 3 small red chillis, finely chopped (de seed if you don’t want too spicy or replace with 1 large chilli)
  • 1 tsp mustard seeds
  • 2 chicken breasts, chopped into bite size pieces
  • 6-7 closed cup mushrooms, sliced
  • 3 tomatoes, finely chopped
  • 2 tsp amchoor powder (use 1tbsp tamarind puree or lime juice instead if you don’t have)
  • 1 tsp chilli powder
  • salt & pepper
  • handful of chopped fresh coriander
  1. Boil the dhal in plenty of water until cooked through – this takes about 20-25 minutes (channa dhal takes longer – you can tell when its done when the middle goes from opaque to more transparent and they double up in size). Then drain and set aside until needed.
  2. Meanwhile, toast the coriander seeds until they start to pop. Then tip into a pestle and mortar and grind to a rough powder
  3. Heat the oil in a large saucepan or wok. When it’s hot add the onion, garlic, ginger, curry leaves, fresh chillis, coriander seeds and mustard seeds. Fry for a few minutes until the onion starts to brown and the mustard seeds pop.
  4. Then add the chicken and mushrooms and cook until the chicken whitens on the outside.
  5. Add the tomatoes, amchoor powder, salt & pepper to taste and chilli powder.
  6. Reduce the heat and dry fry, stiring constantly until the chicken is cooked through – about 7 minutes.
  7. Add the cooked lentils and the coriander and stir through for a minute.
  8. Serve immediately with naan or chappattis.
  9. Enjoy 🙂
Leave a comment »

Lunchbox lunches: bacon and lentil soup

20120424-013712 PM.jpg

My stomach is upset. It’s having an issue (in government speak). Probably from eating too many Easter eggs and drinking too much wine (and cocktails, and g&ts…). So I’m going back to basics and eating simply – nothing too rich, too spicy, too oily or too acidic. And what could be better than a simple healthy lentil soup? Comforting, tasty, easy on the stomach and nothing too exciting to upset it.

And lentils being good sources of both protein and carbs, means I don’t need bread of any kind with it, which may just push my stomach right over the edge. The bacon gives it a nice flavour but it’s not too intrusive. And keeping it chunky means it’s both simple and quick to make (in fact I made it this morning and let it cook whilst eating breakfast and then just dished it into tupperware to take to work.

This recipe is a variation on one I found in my Leith’s Simple Cookery book and my go-to book when I’m not sure about anything.

Bacon & Lentil soup

Serves 3-4

  • 1 onion, finely chopped
  • 3-4 rashers bacon (your choice), cut into lardons
  • 1 garlic clove, minced
  • 200g red or green lentils (choose red if you’re in a hurry they cook quicker)
  • 1 litre chicken stock
  • 2 tomatoes, chopped
  • 250ml passatta (seived tomatoes – or use pasta tomato sauce)
  • Salt & pepper to taste (be careful if using smoked bacon)
  1. Heat a large saucepan on a low-med heat. Add the bacon and onion and allow to sweat slowly and the bacon to release it’s fats. There’s no need for oil as the fats will provide it and make the bacon crispy.
  2. Then add the garlic and cook for a further minute.
  3. Add in the lentils and stir well to coat in the mixture. Then add stock, tomatoes, and passatta. Bring to the boil, stiring well and then reduce to a low simmer and cover.
  4. Simmer until the lentils are cooked – about 15 to 20 minutes.
  5. Add salt & pepper to taste and serve with hunks of farmhouse bread, or just eat on it’s own enjoying it’s pleasing chunkiness.
  6. Enjoy 🙂
Leave a comment »

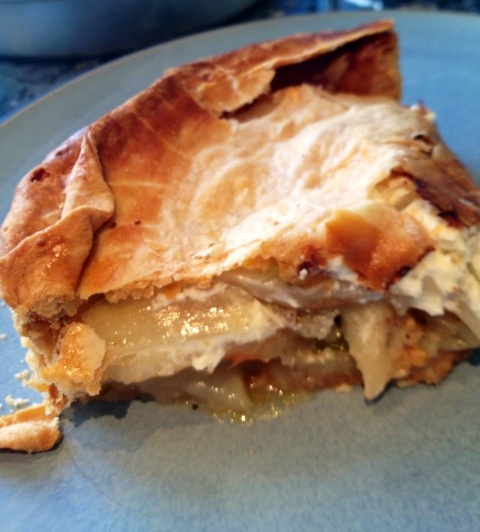
Pie attempts: Cheese and onion pie

20120424-021328 PM.jpg

I decided to brave it and try a pie again. Not making pastry from scratch – that came out the freezer – baby steps! But actually making a pie and trying to not either have it come out burnt or soggy, or even both.

Turns out one of Mr J’s favourite foods is cheese and onion pie. You think you know someone, and then they go and tell you a thing like that after 11 years – you wonder why they’ve been hanging onto that piece of information for so long! And here I was thinking profiteroles or steak or a cheeseboard were his favourite things!

I found a recipe for cheese and onion pie that didn’t seem too difficult. And thought I’d try it. Then I spoke to my mother in law who told me to blind bake it first and wash it in egg glaze. And to use a metallic cake tin (as I don’t have a pie dish). This proved good advice but did turn the recipe from something that seemed simple to something that wasn’t.

This is not for those of you who are allergic to cooking or not confident about what you’re doing. It’s also not good for small kitchens (I managed to get pastry all over mine, and cover every surface in things, and it’s a good size these days!) Buy it in Greggs instead. It is, however, perfect for the confident vegetarian. Or those adept at pies. Or the foolish (like me).

The original recipe is here http://www.bbcgoodfood.com/recipes/9650/deepdish-cheese-onion-and-potato-pie

And here is my version including my mother in law’s advice (which I definitely recommend if you’re avoiding burning and sogginess).

Cheese and onion pie

Serves 6-8

  • 1 packet ready made shortcrust pastry (defrost if frozen first)
  • 1 egg, beaten
  • 4-5 medium potatoes, peeled and finely sliced
  • 2 onions, finely sliced
  • bunch of spring onions, roughly chopped
  • 200g strong cheddar, grated
  • 200g creme fraiche
  • grated nutmeg
  • paprika
  • salt & pepper
  1. Pre heat the oven to 200 degrees celsius
  2. Grease and flour a large cake sponge tin or pie dish (about 20-23cm)
  3. Flour a dry clean surface. Roll out your pastry until quite thin (but not so it’s breaking).
  4. Place 2/3 of it in the tin, so that there’s enough overhang (but not too much) and gently push into the edges of the tin. Blind bake (I scrunch up greaseproof paper and then smooth out and place on top of the pastry (including overhang) and then fill with rice – you can still cook toasted rice) for 15 minutes.
  5. Remove from the oven. Remove the rice and paper and egg wash the pastry. Cover the overhang pastry with greaseproof paper again (but not the rest) and bake for a further 5 minutes. It should be pale but firm and crispy.
  6. Remove from the oven and allow to cool for a few minute.
  7. Add a layer of sliced potatoes to the bottom of the pie, followed by a sprinkling of onions & spring onions and cheese. Shake over a bit of nutmeg and paprika and some salt & pepper. Repeat with another layer, this time putting half the creme fraiche on the top. Then another layer of potatoes, onions, cheese until it’s used up (it will come above the pastry). Gently push the layers down a bit. Then dollop on the remaining creme fraiche.
  8. Roll out the remaining pastry a bit thinner than the bottom pastry until it will cover the pie. Brush the underneath pastry overhang with egg then place the pastry on top, washing all over with egg and pressing it hard to the bottom overhang pastry.
  9. Make 2 small slits in the top of the pastry to allow air to come out.
  10. Bake in the oven for 30 minutes, then turn down the oven to 170 degrees celsius and cook for a further 30 minutes.
  11. Remove. Allow to cool for 1o minutes then serve with a nice green salad.
  12. Enjoy!

20120424-021321 PM.jpg

Leave a comment »

Italian style rice & egg salad

20120402-040321 PM.jpg

It was sunny yesterday, and a pleasant return to the UK after a great holiday in Cape Verde where we just chilled out, ate too much and I didn’t cook once. Just what I needed. So I returned 1/2 a stone heavier and in need of a diet. I wanted to do something healthy and light and salad seemed like a good thing. But we didn’t have much in the fridge, so I was being inventive.

I got the recipe from my new Italian Comfort Foods cook book, which you can find here http://www.amazon.co.uk/Italian-Comfort-Food-Soul-Satisfying-Recipes/dp/1856269361/ref=sr_1_1?ie=UTF8&qid=1333377952&sr=8-1 and it uses pickled vegetables. But I didn’t have any of them, except for onions, so I just used marinated roasted peppers and artichokes and some olives instead. And some sweetcorn that was lurking in the fridge. I also didn’t have any mozzarella, so I used goats cheese and it was delicious.

So basically – just substitute whatever you’ve got into the salad and I’m sure it’ll be fine.

I also used Thai Jasmine rice for the rice, as that’s what I had, but I wouldn’t recommend it. It was ok but it’s quite a sticky rice. I think a long grain rice would be better for a salad.

Italian style rice & egg salad

Serves 3

  • 130g rice
  • 1/2 lemon
  • 1.2l water
  • 1 tsp salt
  • 90g pickled onions (the little ones you use for cheese crackers – I had leftover ones from Christmas!)
  • 100g (ish) roasted peppers from a jar – drain and rinse off the oil and slice into strips.
  • 100g (ish) artichoke hearts from a jar – again drain and rinse off the oil
  • 100g (ish) green olives – rinse off the oil or brine
  • 100g tinned sweetcorn, drained
  • 6 cherry tomatoes, halved
  • 3 eggs, hard boiled, peeled and sliced
  • 100g mozzarella cheese (real stuff, not the pizza stuff), diced or use goats cheese instead
  • handful of mint leaves, chopped
  • 1 tbsp mayonnaise
  • 1tsp English mustard
  • salt & pepper to taste
  1. Heat the oven to 180 degrees celsius. Spread the rice out on a baking tray and place in the oven to toast for a few minutes.
  2. Bring the water to boil, place the lemon in the water and the salt and then add the rice. Re-bring to the boil, then cover and reduce to a simmer until the rice is just cooked (you don’t want to over cook it and have all the starch come out) – about 10 minutes.
  3. Then drain and rinse under cold water until the rice is cooled and the water runs clear. Set aside until needed.
  4. Meanwhile, combine the mayonnaise, mustard, salt & pepper to form a dressing.
  5. Put all the salad ingredients in a large salad bowl (the larger the better for mixing) and toss. Add the rice and toss again.
  6. Add the dressing and toss once more to combine then serve immediately.
  7. Enjoy! 🙂
Leave a comment »

Easy healthy midweek pasta: spicy bacon & aubergine pasta

20120321-022038 PM.jpg

This was one of those – random things in fridge and in need of something quick and healthy to eat before the gym. And it worked really well actually. At just over 400 calories it certainly ticks the healthy box, and it was very tasty and didn’t take very long to make either – certainly a Jamie Oliver contender. You could even leave the bacon out (and maybe add mushrooms) for a vege option too.

The recipe came from my trusty BBC good food site http://www.bbcgoodfood.com/recipes/874651/aubergine-chilli-and-bacon-pasta and I didn’t really change that much of it, although I made less than it suggested and it was enough to go round.

Spicy bacon & aubergine pasta

Serves 3

  • 225g pasta shapes
  • 1 tbsp olive oil
  • 1 aubergine, cut into small cubes
  • 4 rashers of rindless back bacon, cut into lardons
  • 1 garlic clove, crushed
  • 2 red chillis, finely chopped
  • 1 tin tomatoes
  • handful of grated parmesan to serve (optional)
  1. Boil the pasta according to the packet instructions. Drain and set aside until needed.
  2. Meanwhile, heat the oil in a pan and add the aubergine. Cook over a medium heat until softened – about 5 minutes.
  3. Add the bacon and cook until browned and crispy, about another 5 minutes.
  4. Add the garlic and chilli and stir through for a minute before adding the tomatoes, breaking them up with the spatula if necessary.
  5. Add salt & pepper to taste.
  6. Bring to the boil and then simmer until you have a nice thick sauce.
  7. Stir through the pasta and then tip onto plates, topped with parmesan if using.
  8. Eat immediately and enjoy!
Leave a comment »

Healthy comfort food: Root vegetable dhal

Continuing with the health kick but in need of some comfort as I had a bit of a cold, I thought I’d do something with lentils.  And as you know, I love dhal and I had left over veges from my Christmas vege box that I didn’t know  what to do with, so this seemed like the perfect answer.

My original inspiration came from here http://www.bbcgoodfood.com/recipes/1364/spicy-root-and-lentil-casserole

But to me, this isn’t a casserole, it’s dhal, and I ate it with chappatis.  I kept it more or less the same as the recipe, but substituted the parsnips for swede as that’s what I had and it turned out very well.  And I added a tin of tomatoes and some tomato puree and reduced the amount of stock used.  Also, the recipe makes way more than 4 portions.  I’d say at least 6.  So it’s great for freezing for another day when you dont’ want to cook.

I checked the calories for 6 servings on my recipe and it comes to 292 calories, so this is a very tasty, very filling ,very healthy, very comforting meal – absolutely perfect for January!  It’s also high in vitamins A &C – so great for boosting your immune system, high in calcium and iron as well.  Very low in fat and high in fibre.  Bonus!

Root vegetable dhal

Serves 6

  • 2 tbsp sunflower or vegetable oil
  • 2 onions, finely chopped
  • 2 garlic cloves, finely chopped
  • 2inch piece root ginger, grated
  • 1 red chilli, finely chopped or 1 tsp chilli powder (leave out if you don’t want too spicy)
  • 1 tsp turmeric
  • 1.5 tsp ground cumin
  • 1.5 tsp ground coriander
  • 1 tsp ground cinnamon
  • 2 tbsp curry paste (I used pataks jalfrezi paste as that’s what I had – or substitute for madras hot curry powder)
  • 700g potatoes, peeled and small cubed
  • 4  carrots, peeled and chopped into chunks
  • 1 swede, peeled and chopped into small cubes
  • 100g red lentils
  • 1 tin tomatoes
  • 700ml vegetable stock
  • 2 tbsp tomato puree
  • salt & pepper
  • handful of chopped fresh coriander
  1. Heat the oil in a large saucepan or wok on high.
  2. Add the onions and garlic, frying until the onion starts to brown.
  3. Then add the chilli and garlic and fry for a further minute.
  4. Add the dried spices, mixing well to combine for another minute or until they start to smell fragrant.
  5. Then add the curry paste, breaking it up with the spoon or spatula.
  6. Add the veges and turn the heat down to medium.  Stir well to coat with the spice mix and fry for a few minutes until they start to soften.
  7. Then add the lentils, mixing in well with the spices.
  8. Add the tomatoes, breaking them up with the spatula, if they aren’t already.  Then add the tomato puree and the stock.
  9. Mix well, turn up the heat until it starts to boil.
  10. Then turn down the heat to a low simmer and leave to simmer, stiring occasionally to prevent sticking, for about 20 minutes or until the lentils are mushy and the vegetables are cooked through.  Add extra water if it starts to get too dry.
  11. Add the salt, pepper and coriander to taste and bubble of any additional water until you have quite a thick sauce.
  12. Serve with naans or chapattis and enjoy!
Leave a comment »

Healthy, quick stew: creamy seafood stew

20120110-030140 PM.jpg

I was looking for inspiration the other day, and came across this recipe http://www.bbcgoodfood.com/recipes/1267642/creamy-seafood-stew. As I had pretty much everything in the recipe in my cupboards, it seemed like an excellent place to start. The added bonus is its only 270 calories (plus your garlic bread) so it’s very healthy, light, tasty, warming and generally great for this time of year.

I have to say – this one did cause controversy between me and hubby. He wasn’t so keen. But then he’s not so keen on pre-cooked mixed seafood – he likes to know what he’s eating. For me, however, I thought it was pretty good. And something I’d definitely eat again. I thought it was filling but light, creamy, indulgent without being full of sugar and fats. So up to you. Personally I think it’s great. But if you’re not a seafood lover, then maybe it’s not for you. But I was thinking it would work equally well as a fish stew with some chunky white fish – maybe pollack or coley or cod and some prawns or squid rings.

I do like it with garlic bread (we had garlic pitta bread!) but you could also do some boiled new potatoes with it instead.

It’s also very quick – so word of warning – get your garlic bread in the oven first and then cook the rest of it. It doesn’t take as long as the original recipe suggests – perhaps because I cook on gas?

Creamy seafood stew

Serves 2

  • 1 tbsp olive oil
  • 1 onion, finely chopped
  • 1 small carrot, finely chopped
  • 2 celery sticks, finely chopped
  • 1 garlic clove, crushed
  • 100ml white wine
  • 150ml chicken or fish stock
  • 1/2 tbsp cornflour mixed with same amount of cold water
  • 200g mixed seafood (frozen or fresh, defrosted if necessary)
  • 2.5 tbsp low fat creme fraiche (or use double cream if you don’t have, but it will increase the calories)
  • small handful of chopped fresh dill
  • salt & pepper
  1. Heat the oil in a large pan or saucepan on a medium heat. Add the onion, celery and carrot and fry until softened and translucent but not browned. Add a little bit of salt if it starts browning.
  2. Then add the garlic and fry for another minute.
  3. Add in the wine and increase the heat to high. Allow to bubble until very reduced. Then add the stock and cornflour mix.
  4. Reduce to a thick sauce consistency then add in the seafood mix, dill and crème fraiche, stirring well to combine.
  5. Cook for a few minutes until the seafood is heated through and the sauce is a thickish consistency.
  6. Serve immediately with garlic bread or new potatoes.
  7. Enjoy your healthy tasty virtuousness 🙂
Leave a comment »

January detox continues: another avocado, beetroot and goats cheese salad!

20120106-124544 PM.jpg

This is a different salad – completely different – I promise! It may have avocado, beetroot and goats cheese in it, but that’s all that’s similar to the other salad.

I found this through foodpress, and thought it looked both simple and healthy. The original doesn’t have goat’s cheese in it but I wanted to beef it up a bit and had some goats cheese left over. I think it goes very nicely. And of course, if you’re vegan or lactose intolerant you can just leave it out.

http://crystalchild.wordpress.com/2012/01/01/carrot-beet-and-avocado-salad/

I also didn’t have any apple juice or cider vinegar so I used white wine vinegar and more lime juice. And I used pumpkin seeds instead of sunflower seeds because I didn’t have any of them either.

It’s very good though, lots of colour, different textures, flavours – very exciting – doesn’t feel like you’re dieting at all, when in fact it’s low GI, high in protein, high in good fats – and just about perfect for an office lunch.

Beetroot, avocado and goats cheese salad

Serves 2 (as a main)

  • 2 medium cooked beetroots, grated
  • 1 large carrot, grated
  • 2 green apples, cored and finely chopped (or grated)
  • handful of chopped fresh herbs (I used thyme, but parsley or coriander is also good)
  • 1 avocado, peeled and diced
  • 80g goats cheese, crumbled.

For the dressing:

  • Juice of 1 lime
  • 2 tbsp olive oil
  • 1 tsp white wine vinegar
  • 1/2 tsp ground coriander
  • salt & pepper
  • handful of sesame seeds
  • handful of pumpkin or sunflower seeds
  1. Put the grated carrot and beetroot in a bowl along with the apples and fresh herbs. Toss to mix.
  2. Make the dressing by combining all the ingredients and whisking to form an emulsion.
  3. Pour the dressing over the salad and mix well to combine.
  4. Add the avocado and goats cheese and carefully mix.
  5. Serve immediately with some nice crusty bread.
  6. Enjoy!
Leave a comment »